STEPS:
1. Convert ODF into XML
2. Read/Write XML
Introduction
The OpenDocument Format (ODF) is an XML-based file format for representing electronic documents such as spreadsheets, charts, presentations and word processing documents. The standard was developed by the OASIS (Organization for the Advancement of Structured Information Standards), and it is a free and open format.
The OpenDocument format is used in free software and in proprietary software. Originally, the format was implemented by the OpenOffice.org office suite and, with Office 2007 SP2, Microsoft also supports ODF subset.
This article will explain the basics of ODF format, and specifically its implementation in spreadsheet applications (OpenOffice.org Calc and Microsoft Office Excel 2007 SP2). Presented is a demo application which writes/reads tabular data to/from .ods files. The application is written in C# using Visual Studio 2010. Created .ods files can be opened using Excel 2007 SP2 or greater and OpenOffice.org Calc.
ODF Format
OpenDocument format supports document representation:
- As a single XML document
- As a collection of several subdocuments within a package
Office applications use the second approach, so we will explain in detail.
Every ODF file is a collection of several subdocuments within a package (ZIP file), each of which stores part of the complete document. Each subdocument stores a particular aspect of the document. For example, one subdocument contains the style information and another subdocument contains the content of the document.
This approach has the following benefits:
- You don't need to process the entire file in order to extract specific data.
- Images and multimedia are now encoded in native format, not as text streams.
- Files are smaller as a result of compression and native multimedia storage.
There are four subdocuments in the package that contain file's data:
- content.xml - Document content and automatic styles used in the content
- styles.xml - Styles used in the document content and automatic styles used in the styles themselves
- meta.xml - Document meta information, such as the author or the time of the last save action
- settings.xml - Application-specific settings, such as the window size or printer information
Besides them, in the package, there can be many other subdocuments like document thumbnail, images, etc.
In order to read the data from an ODF file, you need to:
- Open package as a ZIP archive
- Find parts that contain data you want to read
- Read parts you are interested in
On the other side, if you want to create a new ODF file, you need to:
- Create/get all necessary parts
- Package everything into a ZIP file with appropriate extension
Spreadsheet Documents
Spreadsheet document files are the subset of ODF files. Spreadsheet files have .ods file extensions.
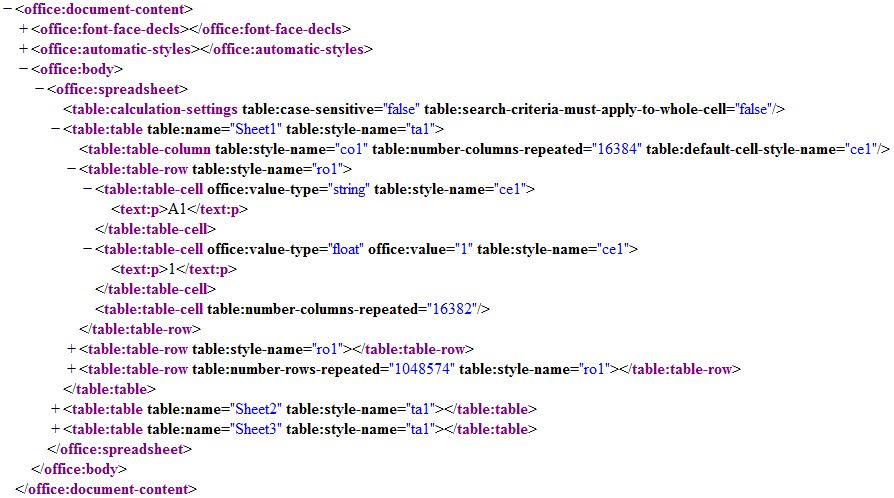
The content (sheets) is stored in content.xml subdocument.
Picture 1: content.xml subdocument.
As we can see in Picture 1, sheets are stored as XML elements. They contain column and row definitions, rows contain cells and so on... In the picture is data from one specific document, but from this we can see the basic structure of content.xml file (you can also download the full ODF specification).
Implementation
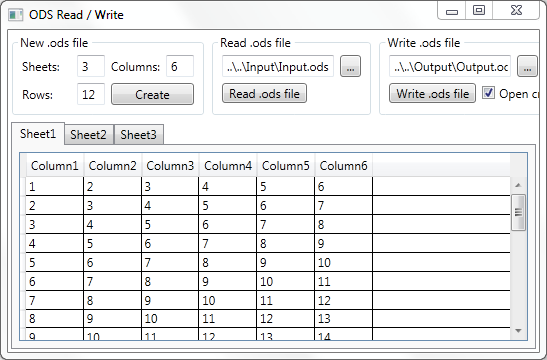
Our demo is Windows Presentation Foundation application (picture 2) written in C# using Visual Studio 2010.
Picture 2: Demo application.
The application can:
- create a new Spreadsheet document.
- read an existing Spreadsheet document.
- write a created Spreadsheet document.
Creating New Document and Underlying Model of Application
Internally, spreadsheet document is stored as DataSet. Each sheet is represented with DataTable, sheet's row withDataRow, and sheet's column with DataColumn. So, to create a new document, we have to create a new DataSet, with DataTables. Each DataTable has a number of rows and columns that conforms to our needs.
To show data from our DataSet (and to allow editing that data) the application dynamically creates tabs withDataGridViews (that are connected to our DataTables).
Through the interface, a user can read, write, edit data and add new rows to the Spreadsheet document.
As application, basically, transforms Spreadsheet document to / from DataSet, it can also be used as a reference forExcel to DataSet export / import scenarios.
Zip Component and XML Parser
Although classes from System.IO.Packaging namespace (.NET 3.0) provide a way to read and write ZIP files, they require a different format of ZIP file. Because of that, our demo uses the open source component called DotNetZip.
Using ZIP component we can extract files, get subdocument, replace (or add) subdocuments that we want and save that file as .ods file (which is a ZIP file).
For processing documents, we have used XmlDocument because it offers an easy way to reach parts that we want. Note that, if performance is crucial for you, you should use XmlTextReader and XmlTextWriter. That solution needs more work (and code), but provides better performance.
Reading Spreadsheet Document
To read a document, we follow these steps:
- Extract .ods file
- Get content.xml file (which contains sheets data)
- Create
XmlDocument object from content.xml file
- Create
DataSet (that represent Spreadsheet file)
- With
XmlDocument, we select "table:table" elements, and then we create adequate DataTables
- We parse children of "
table:table" element and fill DataTables with those data
- At the end, we return
DataSet and show it in the application's interface
Although ODF specification provides a way to specify default row, column and cell style, implementations have nasty practice (that specially apply for Excel) that they rather write sheet as sheet with maximum number of columns and maximum number of rows, and then they write all cells with their style. So you could see that your sheet has more than 1000 columns (1024 in Calc and 16384 in Excel), and even more rows (and each rows contains the number of cells that are equal to the number of columns), although you only have to write data to the first few rows/columns.
ODF specification provides a way that you specify some element (like column/row/cell) and then you specify the number of times it repeats. So the above behavior doesn't affect the size of the file, but that complicates our implementation.
Because of that, we can't just read the number of columns and add an equal number of DataColumns toDataTable (because of performance issues). In this implementation, we rather read cells and, if they have data, we first create rows/columns they belong to, and then we add those cells to the DataTable. So, at the end, we allocate only space that we need to.
Writing Spreadsheet Document
To write a document, we follow these steps:
- Extract template.ods file (.ods file that we use as template)
- Get content.xml file
- Create
XmlDocument object from content.xml file
- Erase all "
table:table" elements from the content.xml file
- Read data from our
DataSet and composing adequate "table:table" elements
- Add "
table:table" elements to content.xml file
- Zip that file as new .ods file.
In this application, as template, we have to use an empty document. But the application can be easily modified to use some other template (so that you have preserved styles, etc.).
Reading from XML to trigger a Selenium Driver
xml:
http://www.gmail.com
bijoy.meethal@gmail.com
inbox
Java code:
/*
* @ Description : A simple program to read XML and retrieve data to manipulate Selenium webdriver
*/
import java.io.File;
import javax.xml.parsers.DocumentBuilder;
import javax.xml.parsers.DocumentBuilderFactory;
import java.util.concurrent.TimeUnit;
import org.openqa.selenium.firefox.FirefoxDriver;
import org.openqa.selenium.*;
import org.w3c.dom.*;
public class GmailXMLTest {
public static void main(String argv[]) {
try {
File file = new File("C:\\TestData.xml"); //file location should be specified correctly
// Prepare XML
DocumentBuilderFactory dbf = DocumentBuilderFactory.newInstance();
DocumentBuilder db = dbf.newDocumentBuilder();
Document document = db.parse(file);
document.getDocumentElement().normalize();
System.out.println("Debug: Root element"+ document.getDocumentElement().getNodeName());
NodeList node = document.getElementsByTagName("TestData");
System.out.println("TestData Details");
System.out.println("________________________________________________");
//Read XML to get test data
for (int i = 0; i < node.getLength(); i++) {
Node currentNode = node.item(i);
if (currentNode.getNodeType() == Node.ELEMENT_NODE) {
Element element = (Element) currentNode;
NodeList mailServerElemntList = element.getElementsByTagName("service");
Element mailServer = (Element) mailServerElemntList.item(0);
NodeList mailServer1 = mailServer.getChildNodes();
String Service = ((Node)mailServer1.item(0)).getNodeValue();
System.out.println("Mail Servername:"+ Service);
NodeList emailNodeElementList = element.getElementsByTagName("email-id");
Element emailNodeElement = (Element)emailNodeElementList.item(0);
NodeList details = emailNodeElement.getChildNodes();
String emailAddress=((Node) details.item(0)).getNodeValue();
System.out.println("email :" + emailAddress);
NodeList passwordNodeElementList = element.getElementsByTagName("password");
Element passwordNodeElement = (Element) passwordNodeElementList.item(0);
NodeList address = passwordNodeElement.getChildNodes();
String passCode = ((Node) address.item(0)).getNodeValue();
System.out.println("Password : "+passCode);
NodeList destFolder = element.getElementsByTagName("folder");
Element destElement = (Element) destFolder.item(0);
NodeList city = destElement.getChildNodes();
String destnFolder = ((Node) city.item(0)).getNodeValue();
System.out.println("Folder : " + destnFolder);
FirefoxDriver wd = new FirefoxDriver();
wd.manage().timeouts().implicitlyWait(60, TimeUnit.SECONDS);
wd.get(Service);
wd.findElement(By.id("Email")).sendKeys(emailAddress);
wd.findElement(By.id("Passwd")).sendKeys(passCode);
wd.findElement(By.id("signIn")).click();
Thread.sleep(8000);
System.out.println(wd.getTitle());
System.out.println(wd.getCurrentUrl());
if (!wd.getCurrentUrl().equals("https://mail.google.com/mail/?shva=1#inbox")) {
wd.close();
System.out.println("Failed to navigate to inbox");
throw new RuntimeException("assertTitle failed");
}
System.out.println("Test Completed - login passed and navigated to inbox");
wd.close();
}
}}
catch (Exception e) {e.printStackTrace();}
}
}
Read/Write".ods" file (OpenOffice.org spreadsheet),Using Selenium Webdriver Data-Driven/Keyword-Driven/Hybrid Framework - QA Hint